Introduction.
This guide will show you how to make an overlay HUD with GBVM that displays variables. Rather than using an actor, it uses the overlay, a window that is displayed over the top of gameplay. The overlay is also used for menus and dialogue in GB Studio, and is used for HUDs in most commercial games. Using the overlay saves sprite tiles and looks great. It’s the best way to make HUDs in GB Studio.
Setting up two custom scripts for the HUD.
We want to be able to open the HUD in any scene and then update it when necessary, so we will make two custom scripts. Click the + button in the Scripts panel on the left to make two custom scripts, and name them ‘Open HUD’ and ‘Update HUD’. Go ahead and add two ‘Call Script’ events that call ‘Open HUD’ and ‘Update HUD’ in that order to the On Init script of your scene.
The ‘Open HUD’ script.
The ‘Open HUD’ script is quite straightforward. We will call this script once any time the HUD is not displayed and needs to be opened.
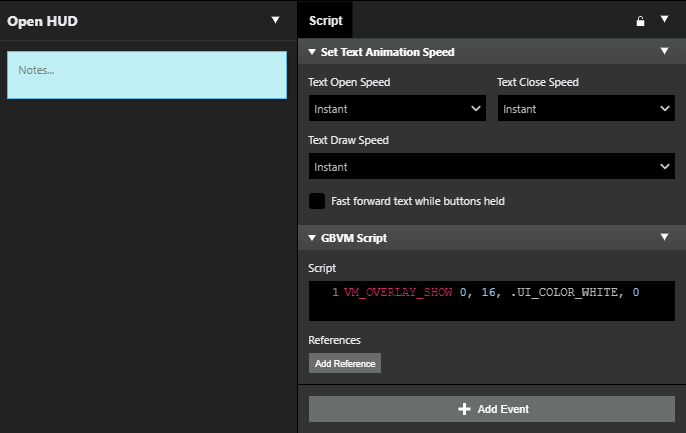
Your ‘Open HUD’ script will consist of two events. The first event is a 'Set Text Animation Speed' event that sets everything to instant. That's because we are technically drawing text to make our HUD, and of course we want it to update instantly! The second event is a 'GBVM Script' event. The GBVM is shown in the code block below. By the way, you can copy code directly from code blocks like this one.
VM_OVERLAY_SHOW 0, 16, .UI_COLOR_WHITE, 0
It uses VM_OVERLAY_SHOW to show the overlay starting at position (x = 0, y = 16) with a blank white background and no extra options. Now if you run the game, the HUD should appear as a white overlay at the bottom of the screen. It is blank right now, so it might be difficult to see if you don’t have a background.
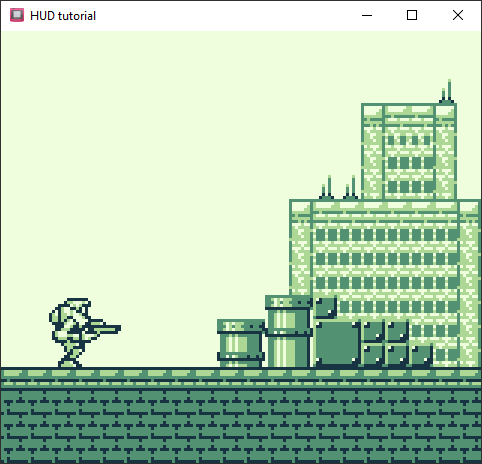
Before and after completing the "Open HUD" script. Yours probably doesn't have a cool robot though.
That’s it for the ‘Open HUD’ script. We won’t have to modify the ‘Open HUD’ script any further. Just remember to call it whenever the HUD is not displayed and needs to be opened, such as at the start of a scene, after a ‘Display Dialogue’ event, or after any other event that uses the overlay. Also always immediately call the ‘Update HUD’ script after the ‘Open HUD’ script so that the newly opened HUD does not remain blank.
If you want to move the size and position of the HUD, change 0 and 16 to the appropriate x and y coordinates respectively.
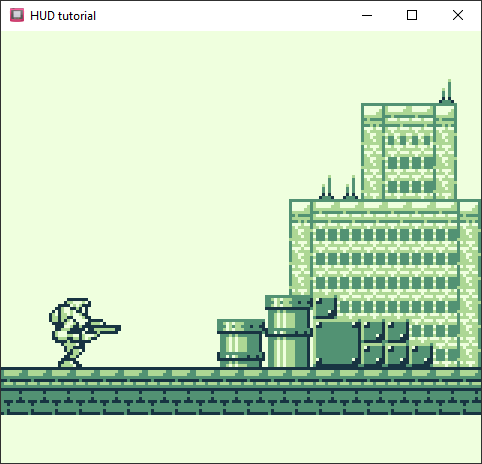
The complete 'Open HUD' script in all its simple glory.
The ‘Update HUD’ script.
Now onto the ‘Update HUD’ script. This is where the actual drawing of the HUD graphics happens. We will call this script any time we want to update the text displayed on the HUD, including when the HUD is blank after using ‘Open HUD’. Add the following GBVM to a ‘GBVM Script’ event in the ‘Draw HUD’ script.
VM_LOAD_TEXT 0 .asciz "Hello world." VM_DISPLAY_TEXT
Here is a breakdown of what the GBVM script does.
- VM_LOAD_TEXT 0 loads the text string from the next instruction
- .asciz "Hello world." provides the text string to be loaded
- VM_DISPLAY_TEXT displays the loaded text on the overlay
Now when you run your game, the HUD should appear as a white overlay at the bottom of the screen with the text “Hello world.” in the bottom left. If it didn’t work, go back and make sure your scripts match all of the above images. If it did work, congratulations, you’ve finished setting up your scripts and completed the most difficult part. The rest of the guide will involve modifying the ‘Update HUD’ script to add more features.

After completing the "Update HUD" script, your game should look something like this.
Displaying a variable on the HUD.
We are going to display a health variable on the HUD by modifying the ‘Update HUD’ script.
VM_LOAD_TEXT 1 .dw VAR_HEALTH .asciz "Health %d" VM_DISPLAY_TEXT
Here is a breakdown of what the GBVM script does.
- VM_LOAD_TEXT 1 loads one variable from the next instruction and then the text string from the instruction after that
- .dw VAR_HEALTH provides the variable to be loaded
- .asciz "Health %d" provides the text string to be loaded, including %d which will display the value of the loaded variable
- VM_DISPLAY_TEXT displays the loaded text on the overlay
The GBVM script uses the GBVM symbol VAR_HEALTH to reference a variable named ‘Health’, but the variable you want to display might be named something different. You will need to figure out the GBVM symbol for the variable you want to display by clicking ‘Add Reference’ on the GBVM event and selecting your variable.
The variables displayed on the HUD will not update automatically whenever the variables themselves update. You will have to call the ‘Update HUD’ script each time you want the displayed variables to update. In this example, in the script that handles the player being hit by an enemy, we would call the ‘Update HUD’ script after decreasing their health by one. This will ensure the HUD will be redrawn to reflect the new health value when the player’s health decreases.
There is one problem with this script. Because we never clear the HUD between updates, if the number of digits in the health variable decreases, a junk tile will be left behind where the missing digit was. We can fix this by adding leading zeroes to our variables so that the number of digits never changes. This can be done by using %D# instead of %d, where # is the number of digits we want our variable to display. Here is an example that ensures our health variable always remains two digits long.
VM_LOAD_TEXT 1 .dw VAR_HEALTH .asciz "Health %D2" VM_DISPLAY_TEXT
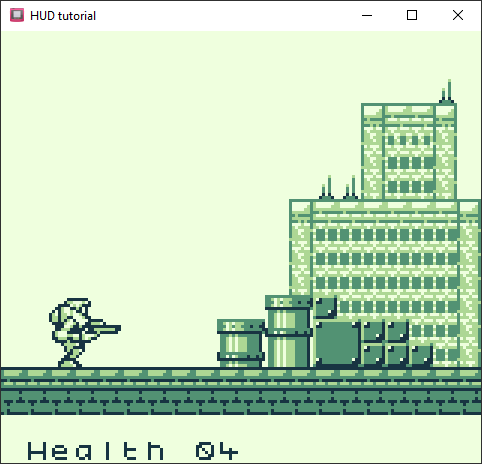
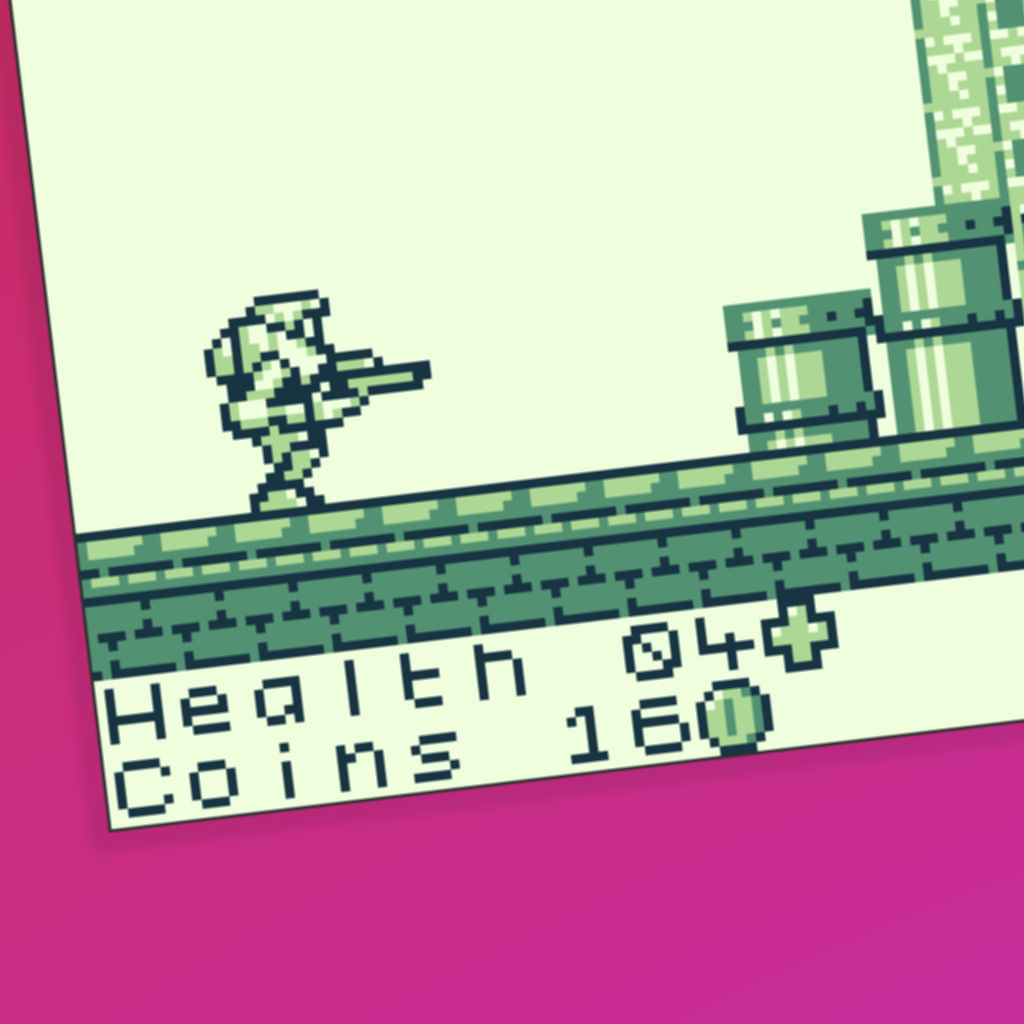
Your game should be looking like this.
Displaying multiple variables on the HUD.
Now we are going to display a second variable showing how many coins the player has collected by modifying the ‘Update HUD’ script.
VM_LOAD_TEXT 2 .dw VAR_HEALTH .dw VAR_COINS .asciz "Health %D2 Coins %D2" VM_DISPLAY_TEXT
VM_LOAD_TEXT 2 now loads two following variables, and an extra %D2 has been added to the text to display the coins variable. If you want to add any number of variables, change the VM_LOAD_TEXT parameter to the number of variables you want to load, and then add the appropriate .dw instructions below.
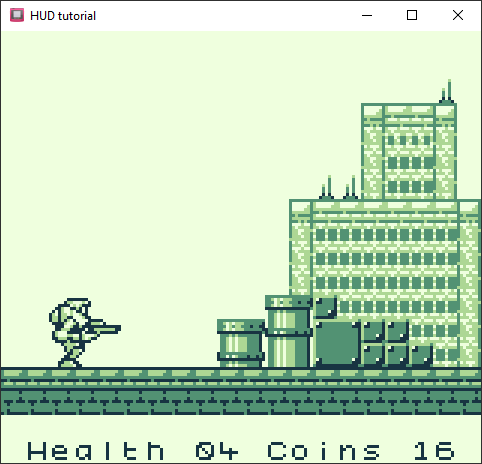
And now your game should be looking like this. Don't worry, we are going make it less ugly in the next part of the guide.
Next steps.
That’s it for the basics of setting up the HUD and displaying some simple text and variables. In part two of this guide, we will cover options for positioning and formatting the text to make a nicer looking HUD that’s game-ready. Make sure you understand the fundamentals covered in this guide before moving on. When you’re ready, head to part two.
Guide by Shin. Last updated 27/12/2023.