Intro.
In part one of this guide, we learned how to print text and variables on the HUD, so we can basically display any information required for a game. However, it would be nice if we had more control over the elements we are drawing on the HUD. This guide explains some options for making a nicer looking HUD, including options for positioning and formatting text.
Preventing HUD flicker.
Some HUDs may flash for one or two frames each time ‘Update HUD’ is called, which is often referred to as flicker. If your HUD doesn’t flicker or you aren’t worried about flicker, you can ignore this section. There are two common causes for HUD flicker.
The first cause is using a variable width font. Variable width fonts are fonts where not all characters are 8 pixels wide. You can identify them by the magenta blocks in their font files. Variable width fonts draw differently causing flicker, so I would advise against using them for HUDs, and instead use a fixed width font without magenta boxes in its font file.
The second cause is drawing text multiple times in your ‘Update HUD’ script. If you use multiple VM_DISPLAY_TEXT instructions in your script, it may take multiple frames to complete each draw and cause flicker. Try to condense all of your text into a single VM_DISPLAY_TEXT call.
Changing the overlay colour.
You can replace .UI_COLOR_WHITE with .UI_COLOR_BLACK in the ‘Open HUD’ script to draw a black overlay instead of white. This looks great combined with a font that has a black background and white text. If using color mode, the darkest color in the UI palette will be used instead of the lightest color.
Using control codes for positioning and formatting.
Control codes give you a lot more control over where and how text is written. To use them, include them in your text strings when using VM_LOAD_TEXT. Below is a list of control codes that are relevant to drawing HUDs.
Control code use octal numbers!
Instead of using everyday decimal numbers, all control codes take octal numbers. Octal numbers are base 8 instead of base 10. For example, when setting text position to (x = 10, y = 10), you would write the control code \003\012\012, because 12 is the octal equivalent of decimal 10. Use an online decimal to octal converter when writing control codes.
\003\###\### sets the next position text will draw from where \###\### are the X and Y coordinates. \003\001\001 will set the next position to the top left corner of the overlay. You can use multiple \003 control codes throughout a text string to draw text at multiple positions on the overlay.
\004\###\### is the same as \003 but sets the position relative to the current position.
\002\### sets the text font where ### is the index of the font to load. Starting from the default font at \002\001 and continuing with \002\002, \002\003 etc, you can pick from fonts that are included elsewhere in the game. If your font is not used anywhere else in the game, it will not load. If you want to include an extra font just for the HUD, you can add an inaccessible ‘Display Dialogue’ event that uses the extra font to any scene.
\007 sets the text buffer background colour when using a variable width font. \007\001 sets it to white, and \007\002 sets it to black. If your variable width font has a black background, you will want to set it to black to avoid white boxes at the end of your text. As mentioned above, I recommend sticking to fixed width fonts to avoid HUD flicker.
\032 to \337 allow you to draw any tile from the current font file. \032 is the first tile, \033 is the second, and so on. This is useful for drawing special characters, images and decoration on the HUD. Don't forget to use octal numbers. 32 in octal is 27 in decimal, so to select a tile, count up from 27 and then convert to octal.
Writing tiles based on the value of a variable.
Using %c, it’s also possible to select a tile from the current font file to draw based on the value of a variable. %c uses a variable’s value as the tile index to draw. Unlike control codes \032 to \337, when using %c the index is in decimal and not octal, from 32 in the top left of the font file to 255 in the bottom right.
The syntax for %c is the same as %d. Here is an example where a tile will be drawn after the text ‘Item’ from index VAR_ITEM in the font file.
VM_LOAD_TEXT 3 .dw VAR_HEALTH .dw VAR_COINS .dw VAR_ITEM .asciz "Health %D2 Coins %D2 Item %c" VM_DISPLAY_TEXT
Using %c might be useful for something like displaying an image of a currently equipped item. You can set an extra variable to an appropriate tile index when swapping equipped items, and then call ‘Update HUD’.
A complete example using control codes.
Now that we know some tricks to make the HUD look nicer, let’s expand on the previous example with a new one.
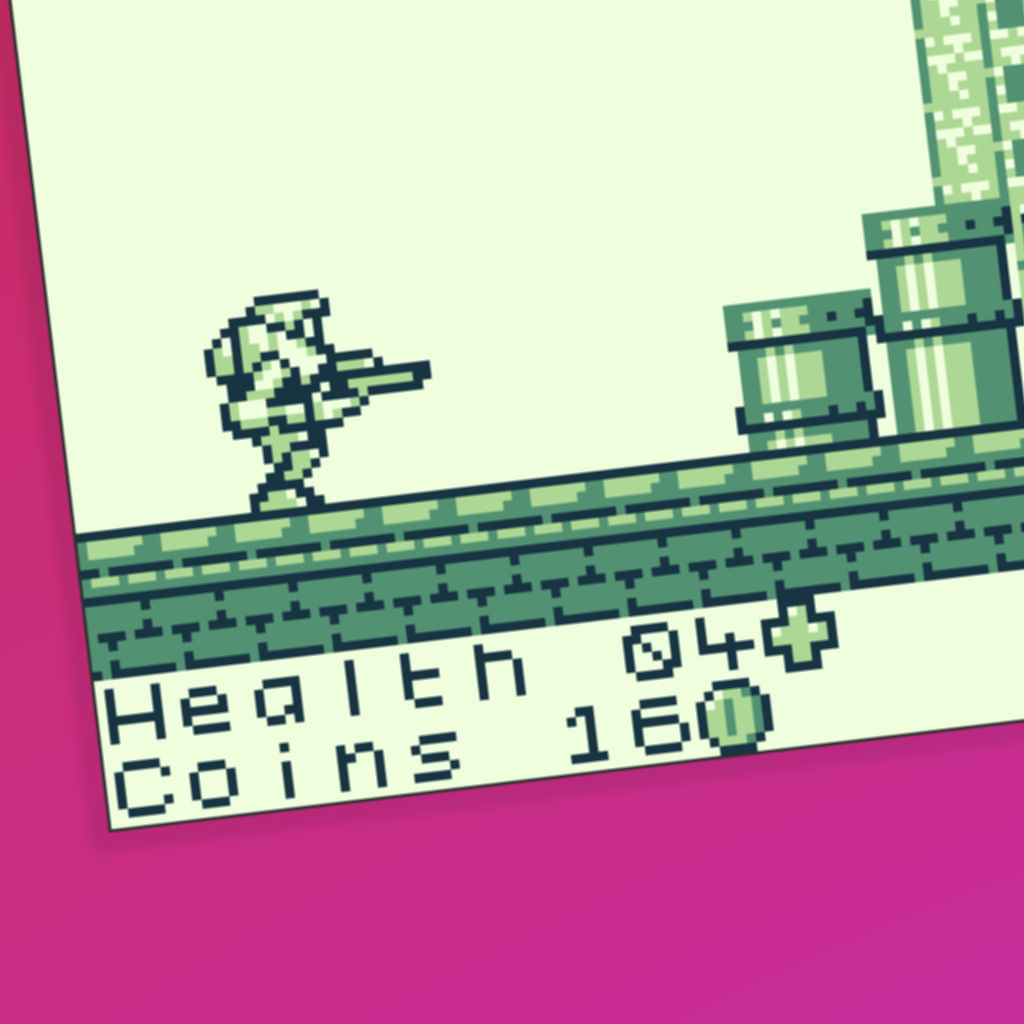
VM_LOAD_TEXT 2 .dw VAR_HEALTH .dw VAR_COINS .asciz "\003\001\001Health %D2\376\003\001\002Coins %D2\377" VM_DISPLAY_TEXT
Here is a breakdown of the text string and the control codes it uses.
- "\003\001\001" sets the text draw position to (x = 1, y = 1), or the top left corner.
- "Health %D2" draws the text "Health" followed by the value of the variable VAR_HEALTH padded to two digits.
- "\376" draws the tile at octal index 376 in the font file. That's a decimal index of 254, so the second last one in the font file. In this case, it's a health symbol.
- "\003\001\002" sets the text draw position to (x = 1, y = 2), or the start of the second row.
- "Coins %D2" draws the text "Health" followed by the value of the variable VAR_COINS padded to two digits.
- "\377" draws the tile at octal index 377 in the font file. That's a decimal index of 255, so the last one in the font file. In this case, it's a coin symbol.
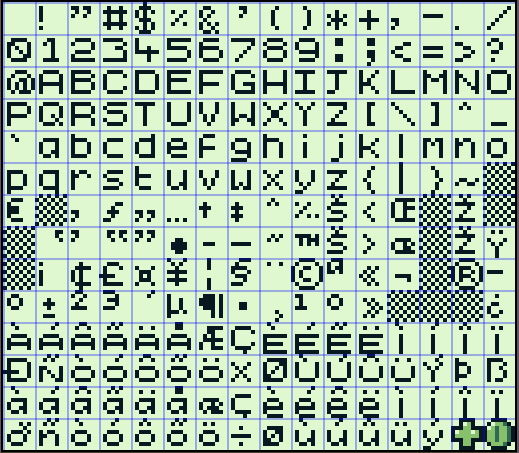
This is the font file used in the example. The last two tiles have been replaced with custom graphics for the HUD.
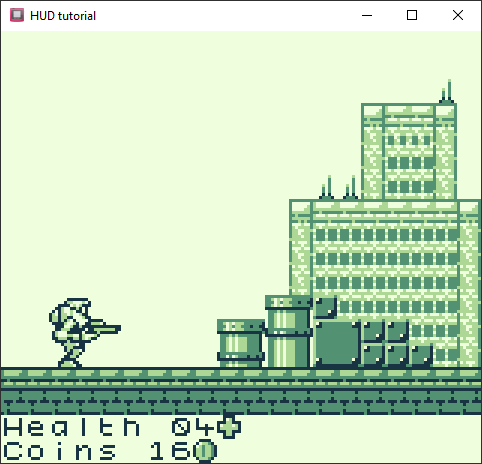
The finished product. This example is not the prettiest, but you should have the tools to make anything you like now.
Next steps.
That’s it for making the overlay HUD look nicer. The tools in this guide are powerful and can already make a limitless amount of different HUDs. However, there is one more advanced technique for making HUDs with detailed graphics, using submaps. I wrote a short guide on the power of submaps, including instructions for adding a background to your HUD.
Guide by Shin. Last updated 24/04/2023.